Create React App served with https and a self-signed SSL certificate

How to generate a self-signed SSL certificate for Create React App using https that is trusted by Chrome.
Why should I use an SSL certificate during local development?
I’m a firm believer in dev/prod parity so when setting up local development for a new project, I want to get as close as I can to the way in which the app will run when live.
It’s easy to ignore browser warnings. Especially when you just know this won’t be a simple, fixed time approach and any solution probably involves gleaning snippets of information from multiple Web searches and StackOverflow comments that apparently worked for someone with some configuration of software at some point in time.
Deep down we know it’s not good to ignore warnings so I suggest drawing the line at anything related to security.
Setting up a self-signed SSL certificate to serve via https and have your browser trust your app is a necessary chore. However doing this enables you to develop and handle the appropriate security as you’re going, to see and solve problems as they appear instead of hoping it all just works at the end (it won’t).
But what if there was a quick guide? Strap in and read on because we’re going to get Chrome to trust our self-signed certificate!
I’m using Homestead, which is based on Vagrant, to be able to virtually use a Linux environment but these steps should also work on any *nix like OS e.g. Mac.
Generating a self-signed SSL certificate
Let’s make a directory for the certificate files and generate the files:
|
1 2 |
mkdir ssl cd ssl |
If you are using Git, add the ssl/ directory to your .gitignore so you don’t commit your local certificate files because you will want to use a certificate signed by a trusted authority in production.
|
1 2 |
# SSL certificate files ssl |
This is important: to make Chrome trust the SSL certificate we’re going to generate, we need to specify certain values so let’s use a configuration file.
I’m using dev.test for my local development domain name for this example app. The domain name does matter so change it to the domain name you are using in the following configuration file. Save this file to the ssl/ directory as dev.cnf
|
1 2 3 4 5 6 7 8 9 10 11 12 13 14 15 16 17 18 |
[req] distinguished_name = req_distinguished_name x509_extensions = v3_req prompt = no [req_distinguished_name] C = UK ST = A State! L = A City! O = A Company! OU = A Division! CN = dev.test [v3_req] keyUsage = critical, digitalSignature, keyAgreement extendedKeyUsage = serverAuth subjectAltName = @alt_names [alt_names] DNS.1 = dev.test IP.1 = 127.0.0.1 |
Now we can generate the required dev.key and dev.crt certificate files using the openssl command using the above dev.cnf configuration file. Note: I’ve chosen to set this certificate to expire in one year / 365 days instead of the default of one month. Run this in the ssl/ directory:
|
1 |
openssl req -x509 -nodes -days 365 -newkey rsa:2048 -keyout dev.key -out dev.crt -config dev.cnf -sha256 |
Serving with https and your self-signed SSL certificate
Now in our React app, let’s add a new script in package.json to reference our new certificate files using the HTTPS, SSL_CERT_FILE, and SSL_KEY_FILE environment variables. Note: I’m using cross-env to set environment variables reliably across different platforms so yarn add cross-env or npm install cross-env if you don’t have it installed already.
|
1 2 3 |
"scripts": { "start:https": "cross-env HTTPS=true SSL_CRT_FILE=./ssl/dev.crt SSL_KEY_FILE=./ssl/dev.key react-scripts start" } |
The above environment variables can alternatively be specified in a .env file (but not .env.development because they will be ignored if not prefixed for security).
Build your app and open the server with your new script:
|
1 2 |
yarn start:https # or npm run start:https |
Open your app in Chrome specifying https and the default port e.g. https://dev.test:3000
Finally, you will still see the ‘Your connection is not private’ error so we need to tell Chrome to trust your self-signed certificate.
In Chrome Settings, chrome://settings , search for ‘Manage certificates’ (or navigate Privacy and security; Security; Manage certificates).
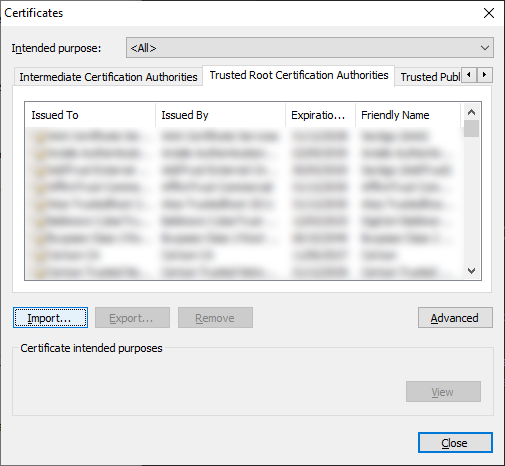
Select the tab, Trusted Root Certification Authorities and press Import…
Browse to your dev.crt certificate, press Next, and ensure the option for the Certificate store is Trusted Root Certification Authorities. Press Next, and Finish.
Restart Chrome, chrome://restart , to see your secure connection!